Installing a fire rated dryer box is an essential safety measure to protect your home from potential fires caused by a malfunctioning dryer. This guide will walk you through the steps to safely install a fire rated dryer box in your home.
1. Understanding the Importance of a Fire Rated Dryer Box
A fire rated dryer box is designed to help contain and prevent the spread of fires that may originate in the dryer duct. It is made from fire-resistant materials and helps to protect your home in case of a dryer fire. Here are some key reasons why installing a fire rated dryer box is important:
- Prevents the spread of fire within the walls
- Reduces the risk of a dryer fire spreading to other parts of the house
- Ensures compliance with building codes
- Provides peace of mind for homeowners
2. Choosing the Right Fire Rated Dryer Box
When selecting a fire rated dryer box for your home, there are a few factors to consider:
Materials
- Look for a fire rated dryer box made from high-quality, fire-resistant materials such as metal or steel.
- Ensure that the dryer box has been tested and certified to meet fire safety standards.
Size
- Measure the available space in your wall to ensure the dryer box will fit properly.
- Choose a size that can accommodate your dryer duct and allow for proper airflow.
3. Steps to Install a Fire Rated Dryer Box
Step 1: Turn Off the Power
Before you begin the installation process, make sure to turn off the power to the dryer to prevent any accidents.
Step 2: Remove the Old Dryer Box (if applicable)
If you are replacing an existing dryer box, carefully remove it from the wall to make space for the new fire rated dryer box.
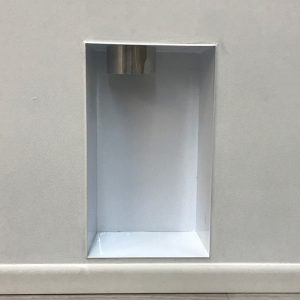
Step 3: Install the Fire Rated Dryer Box
- Place the new fire rated dryer box in the wall opening and secure it in place using screws.
- Connect the dryer duct to the dryer box using clamps to ensure a tight seal.
- Make sure the dryer box is level and properly aligned with the exterior vent.
Step 4: Seal the Gaps
Use fire-rated caulk or foil tape to seal any gaps between the dryer box and the wall to prevent air leaks and improve fire resistance.
Step 5: Test the Installation
Once the fire rated dryer box is installed, turn on the dryer and check for any leaks or issues with the ductwork. Make sure the airflow is not restricted and that the dryer is functioning properly.
4. Maintaining Your Fire Rated Dryer Box
Regular maintenance is crucial to ensure the continued safety and effectiveness of your fire rated dryer box. Here are some maintenance tips:
- Clean the dryer duct and lint trap regularly to prevent lint buildup.
- Inspect the dryer box for any damage or signs of wear and tear.
- Check the exterior vent for obstructions or blockages that may impede airflow.
- Schedule annual inspections by a professional to ensure the dryer box is functioning properly.
5. Conclusion
Installing a fire rated dryer box is a crucial step in protecting your home and family from the dangers of a dryer fire. By following the steps outlined in this guide and choosing a high-quality fire rated dryer box, you can ensure the safety and efficiency of your dryer system for years to come.